Super Mario Kart — The Original Kart Racer, Table by Table: All 20 Courses, All 8 Drivers, Every Item, and the Mini-Turbo Most Guides Get Wrong
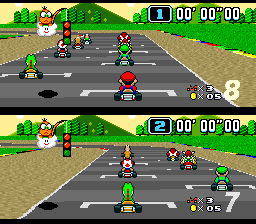
Every kart racer you have played since 1992 is answering this one. Super Mario Kart (Nintendo EAD / Nintendo, 1992) took the split-screen racer, added items that could reverse a race in one corner, split its eight drivers into four sharply different performance pairs, and hid its fastest technique — a drift boost with no sparks to tell you it exists — in the official guidebooks rather than on the screen. This guide is built for the reader who came to look something up: all 20 race courses in cup order plus the four battle arenas, the eight drivers grouped by their real performance profile (with the measured top speeds from the TAS research literature), every player item with where it is actually useful, the full mode and points structure, and a driving section that is careful about one thing above all — what this first game does, as opposed to what its sequels taught you to expect.
A correction before anything else, because it changes how you drive: the Mini-Turbo was not introduced in Mario Kart 64. Reference sources that track the technique across the series (Super Mario Wiki's Drift and Mini-Turbo entries, cross-checked against each other) are explicit that Mini-Turbos have existed since Super Mario Kart, and that the original's official guidebook documented the boost at roughly +2–3 km/h against a normal-road top speed of about 120–135 km/h. What 64 changed was the charging method and the visibility: in this first game there are no coloured sparks while you charge, so generations of players drifted without ever knowing a boost was building. Section 5 of Strategy Essentials gives the original method exactly as those sources describe it — and flags the one point where the two sources describe the input slightly differently.
Quick Facts
| Item | Detail |
|---|---|
| Japanese title | スーパーマリオカート (Sūpā Mario Kāto) |
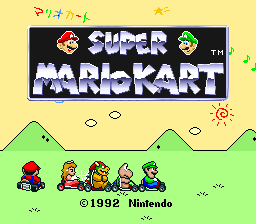
| English title | Super Mario Kart |
| Platform | Super Famicom / Super NES |
| Release date | Japan: August 27, 1992; North America: September 1, 1992; Europe: January 21, 1993 |
| Developer | Nintendo EAD |
| Publisher | Nintendo |
| Genre | Kart racing — split-screen (the race view is always split; in 1-player the lower half carries the map / rear-view display) |
| Players | 1–2 |
| Drivers | 8, in four performance pairs (see Strategy Essentials §2) |
| Courses | 20 race courses (4 cups × 5) + 4 battle courses — the only game in the series with five courses per cup |
| Cartridge | 4 Mbit (512 KB) ROM, DSP-1 coprocessor, battery-backed RAM (Time Trial records are saved to the cartridge) |
| Series position | The first Mario Kart game; the origin of the item box, the Battle Mode balloon rule, and the drift boost |
Overview
The structure is lean, and almost every part became the genre's template. Eight drivers race five-lap Grands Prix over short, flat Mode 7 circuits. Question Mark panels (this game's item boxes) roll you an item whose strength depends on your position — leaders get Banana Peels and Green Shells, the back of the field gets Stars and Lightning. Coins on the racing line raise your top speed, up to ten; being hit or falling off costs coins, and being jostled while holding none makes you spin. You must finish each race in the top four to advance; fifth or lower costs one spare kart (you start with four karts in total, i.e. three retries) and you repeat the race.
Two design decisions later games quietly reversed: the cups have five courses, not four — this is the only Mario Kart where that is true, confirmed across every course listing consulted — and the starting classes are only 50cc and 100cc: the Special Cup is earned at 100cc, and 150cc behind that (§4). Time Trial, Match Race and Battle Mode all run at 100cc specification, as the original manual states.
Why It Still Matters
Super Mario Kart matters first as invention under constraint. The Super Famicom could show one Mode 7 plane; the team wanted two players racing at once, so the screen is always split — and the 1-player game turns the lower half into a course map or rear-view mirror. The DSP-1 chip in the cartridge is part of that story: this little 4 Mbit game is enhancement-chip hardware doing maths the base console was not asked to do alone.
It matters second because its handling model is not a rough draft of the modern one — it is a different, complete system. Drifting here is essential, lest the kart spin out on hard cornering; coins are a speed-and-armour economy you manage corner by corner; and the Feather — a full jump on demand — appears in this game and, as the item guides consulted agree, in no later Mario Kart at all.
Highlights
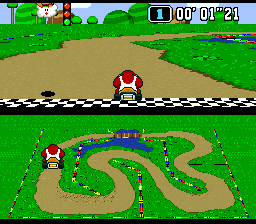
- The always-split screen. Two windows, one Mode 7 world. In 1-player the lower half is information; in 2-player it is the rivalry itself — and Battle Mode, three balloons each, remains the purest form of the idea.
- Four driver pairs, four real games. The roster is eight faces but four performance profiles (§2), and the gap between them is measurable, not cosmetic — at 100cc the fastest and slowest top speeds in the TAS literature differ by 80 internal units.
- The Feather. One item, unique to this game: a high spinning jump that clears barriers, rivals and entire corners. Whole shortcut lines exist only because it does.
- Rainbow Road as a finale with no safety net. The only unnumbered course, closing the Special Cup: narrow, wall-less in the places that matter, and patrolled by Thwomps — the course the whole unlock chain is pointing at.
Strategy Essentials
1. All 24 courses: the four cups and the battle arenas
All race courses are five laps in Grand Prix. Course order within each cup and the cup assignments below are consistent across every listing consulted (Super Mario Wiki, the Mario Kart Wiki, and independent complete guides all agree line for line). Aside from Rainbow Road, every course is numbered, and numbered courses sharing a name share a theme, obstacles and music.
| Cup | #1 | #2 | #3 | #4 | #5 |
|---|---|---|---|---|---|
| Mushroom Cup | Mario Circuit 1 | Donut Plains 1 | Ghost Valley 1 | Bowser Castle 1 | Mario Circuit 2 |
| Flower Cup | Choco Island 1 | Ghost Valley 2 | Donut Plains 2 | Bowser Castle 2 | Mario Circuit 3 |
| Star Cup | Koopa Beach 1 | Choco Island 2 | Vanilla Lake 1 | Bowser Castle 3 | Mario Circuit 4 |
| Special Cup (unlockable — §4) | Donut Plains 3 | Koopa Beach 2 | Ghost Valley 3 | Vanilla Lake 2 | Rainbow Road |
How to read the families, so the table becomes a plan rather than a list:
| Course family | Surface / signature hazard | What it tests |
|---|---|---|
| Mario Circuit (×4) | Paved circuit; oil slicks spin you on contact, pipes stand as walls | The baseline: clean lines, drift discipline, nothing to hide behind |
| Donut Plains (×3) | Dirt plains; water hazards at the edges, Monty Moles pop up on the line | Holding speed off the ideal line; the bridge sections punish crowding |
| Ghost Valley (×3) | Wooden planks over a void; broken edges and holes — falling costs real time | Precision at the edge; the Feather's home ground (see §3) |
| Bowser Castle (×3) | Castle interior; lava, Thwomps, tight right-angle turns | Braking points and patience; heavy drivers suffer most here |
| Choco Island (×2) | Chocolate-brown mud that drags at the kart off the packed line | Staying on the firm surface; light drivers lose least |
| Koopa Beach (×2) | Sand and shallow water; deep water slows you heavily, Cheep Cheeps leap | Choosing the shallow line; coin routes run through the shallows |
| Vanilla Lake (×2) | Ice — the lowest grip in the game; ice blocks as obstacles | Gentle inputs; drifting early and wide, never late and sharp |
| Rainbow Road (×1) | Narrow elevated ribbon, rainbow tiles, Thwomps; falling off is the constant risk | Everything at once — it is the exam the Special Cup sets |
Battle Mode uses four dedicated square arenas, Battle Course 1–4, separate from the race courses. Each player starts with three balloons; being sent into a spin by an item costs one balloon, and the first player to lose all three loses. There is no racing in Battle Mode — position, item control and the Feather's jump are the whole game.
2. The eight drivers: four pairs, measured
The single most useful fact about the roster is that it is four pairs, and the pairing is consistent across the guide literature: Mario with Luigi, Princess Peach (Princess Toadstool in the original Western naming) with Yoshi, Bowser with Donkey Kong Jr., and Koopa Troopa with Toad. Within a pair, the guide descriptions and the measured data agree that performance is shared. The top-speed figures below are the internal values published by the TAS (tool-assisted speedrun) research literature for the 100cc class, the class Time Trial and Battle Mode also use; they are reproduced as a comparison scale, not as km/h. That literature is candid that its handling numbers were rough measurements, so this table gives handling as the guide literature's consistent qualitative verdict instead of inventing precision.
| Pair | Top speed, road (100cc, TAS internal value) | Top speed, off-road (same scale) | Acceleration | Weight / contact | Cornering, per the guide literature | Choose them when… |
|---|---|---|---|---|---|---|
| Mario / Luigi | 911 | 580 (lowest off-road) | Average in all aspects — the reference pair | Middle | Average; better than the heavy pair | You want no surprises: the pair every other pair is measured against. Keep them off the rough — their off-road speed is the roster's worst |
| Princess Peach / Yoshi | 878 | 620 | Fastest acceleration of the roster, with good top speed | Light — easily pushed around | Fast but slidey: some corners must be taken slowly to avoid sliding out | The course is stop-start, or you expect to be hit: nobody recovers to speed faster. The Time Trial literature's natural pick on twisty courses |
| Bowser / Donkey Kong Jr. | 943 (highest) | 610 | Slowest — their weight makes acceleration very slow | Heaviest — they shove others and are hard to shove | Slide a lot more when cornering | The course is long, flowing and open (Mario Circuit 4, Koopa Beach): if you can avoid ever slowing down, nothing catches you. One early mistake costs more than for anyone else |
| Koopa Troopa / Toad | 863 (lowest) | 635 (highest off-road) | Good recovery; the pair's strength is not straight speed | Lightest | Best cornering skills of all drivers, per the walkthrough literature | The course is tight or dirty (Bowser Castle, Choco Island): they lose least off-line and turn where others slide. The classic beginner recommendation in the guides, and a trap for experts on straights |
Three cross-cutting rules the sources agree on:
- Coins move every number up. Each coin held adds a fixed increment to your road top speed (the TAS literature gives +8 internal units per coin), up to ten coins; off-road speed is unaffected. A Bowser with zero coins is slower in practice than a Koopa Troopa carrying ten — which is why coin routes (§5) are driver selection by other means.
- Weight is a weapon and a tax. Heavy drivers spin out lighter ones on contact and resist being spun; the same weight is exactly what makes their acceleration the roster's worst. In Battle Mode this inverts the racing logic: the heavy pair's shove is a genuine threat, while the light pairs must win on items and turning.
- The CPU versions carry signature items. When computer-controlled, each pair uses an exclusive attack the player cannot draw from a panel: Mario/Luigi turn invincible with Star power for a few seconds; Peach and Toad drop Poison Mushrooms that shrink whoever hits them; Yoshi drops an Egg that spins out whoever hits it; Bowser throws Fireballs; Donkey Kong Jr. drops Banana Peels; Koopa Troopa drops Green Shells (which stay in place like bananas). Knowing which silhouette is ahead of you tells you what the road is about to contain.
3. Items: the full player list, and where each one earns its panel
You hold one item at a time, rolled from the Question Mark panels, with the roll weighted by your race position. Availability by mode is where the original game is stricter than its sequels, so the table states it per item; the manual and the wiki item tables agree on the restrictions noted, with one flagged exception below.
| Item | Effect | Best use / the judgement call |
|---|---|---|
| Banana Peel | Drop behind you (A) or throw forward (Up + A). Any kart that touches it spins out — including you, next lap | Defence first: a held banana is a shield in everything but name. As a trap, lay it on the apex or the coin line, where the following kart must drive |
| Green Shell | Fire forward, or drop behind (Down + A) where it stays in place. Bounces off barriers and persists until it hits someone or leaves the course | The bank shot is real: on walled courses (Bowser Castle, Mario Circuit) a fired shell keeps working for seconds. Fire it before the next panel cluster, not after — it is the weakest roll to be holding |
| Red Shell | Fire forward only. Homes in on the kart ahead; breaks on barriers and cannot cross gaps or take sharp corners for you | Fire on straights with a clear line to the target. Fired into a corner it is a gift to the wall. In Battle Mode it is the reliable balloon-taker at mid-range |
| Mushroom | A short, substantial burst of speed | Two jobs: overtaking on a straight, and crossing off-road (sand, mud, grass) without the slowdown — the shortcut enabler on Donut Plains and Choco Island. Before a jump pad it also lengthens the jump |
| Feather | A very high spinning jump — far higher than the L/R hop | This game only. Jump barriers, rivers of lava, rivals, incoming shells — and, on Ghost Valley and Mario Circuit, jump the course itself: gaps and walls that are only crossable this way are deliberate shortcut lines. In Battle Mode, the emergency escape |
| Star | Timed invincibility plus a speed increase; contact spins out other racers. Falling into water, lava or off the edge cancels it early | Both weapon and insurance. The off-road bonus matters as much as the invincibility: under a Star, rough surfaces barely slow you, so take the straight line through them |
| Lightning | All other racers shrink for a while: much slower, and a full-size kart can squash them (a further time penalty) | The comeback item — it is rolled at the back for a reason. Use it where the field cannot hide: before a hazard section, so the shrunken field meets the hazard at half speed. Grand Prix and Match Race only; it does not appear in Battle Mode |
| Coin (item) | Adds two coins to your total when used | Never a wasted roll at the start of a race: two coins is measurable top speed (§2) for free. GP and Match Race only, like Lightning |
| Ghost | You turn transparent/invisible for a few seconds and steal another racer's held item | The one item the sources describe inconsistently: the item tables list it for Battle Mode and Match Race, while some printings of the manual's note list Battle Mode alone. This guide prints it as a 2-player-modes item (Battle and Match Race) following the item tables, and flags the disagreement rather than hiding it. Use it the moment your opponent is holding something you want |
A note on what is not in the table: the CPU-only attacks of §2 (Poison Mushroom, Egg, Fireball, CPU Star) are not player items and cannot be rolled. If a guide lists them as pickups, it is describing the computer's drivers, not your panels.
4. Modes, classes, points and the unlock chain
| Mode | Players | Format | Class | The rules that matter |
|---|---|---|---|---|
| Mario Kart GP (Grand Prix) | 1–2 (2P: both humans + 6 CPU = 8 karts) | 4 cups × 5 courses × 5 laps, against 7 CPU drivers in 1P | 50cc or 100cc at start; 150cc unlockable | Finish top 4 or you do not advance: 5th or lower costs one spare kart (4 karts total at start) and you repeat the race. Points: 1st 9, 2nd 6, 3rd 3, 4th 1, 5th–8th score 0. Trophy (gold/silver/bronze) goes to the highest points totals over the five races |
| Time Trial | 1 | Solo run on any race course; no items, no coins — a clean track | 100cc specification | The top five times per course, with the driver used, are saved to the cartridge battery. This is the mode the driver table (§2) is really for |
| Match Race | 2 | One-on-one race on any race course, no CPU field | 100cc specification | The pure duel: full item set for two (Lightning, Coin item and Ghost all live here), no traffic to hide behind |
| Battle Mode | 2 | Balloon battle on Battle Course 1–4 | 100cc specification | Three balloons each; a spin costs a balloon; lose all three and you lose. No Lightning and no Coin item here — shells, bananas, feathers and the Ghost decide it |
The unlock chain — and here this guide is deliberately precise, because secondary summaries blur it in two directions. What the manual states and the detailed sources support: at the start, the GP offers the Mushroom, Flower and Star Cups at 50cc and 100cc. The Special Cup is a 100cc achievement: the manual's wording is that it "can only be entered after mastering the others in the 100cc class" — i.e. winning the three starting cups at 100cc — and it is not available at 50cc. 150cc sits behind the Special Cup: winning the Special Cup at 100cc (completing the gold set at 100cc) is what opens the 150cc class, after which the game shows its ending and the class is available on reset. Some short web summaries compress this into "beat the cups to unlock 150cc" without the Special Cup step, and some question-and-answer pages misstate which class the Special Cup belongs to; this guide follows the manual-plus-detailed-guide version above and says so, rather than presenting the compressed version as settled. (A documented button code also exists that makes the Special Cup selectable in Time Trial / Match Race without the GP wins; it is printed in the cheat listings for those modes — use the listing that matches your version, and note it does not substitute for the GP unlock.)
5. Driving the original: start, hop, drift — and the boost with no sparks
The Rocket Start. This game's start timing is its own, and later games' timing will fail you here. Per Super Mario Wiki's series-wide Rocket Start table, specific to Super Mario Kart: hold accelerate right as the beep of the first start light ends. Hold it too early and the kart does a burnout — tyres spinning, accelerating slowly off the line; in a five-lap sprint against a top-four cutoff, that is a real cost, not a cosmetic one. Practise the timing in Time Trial, where the start is free.
The hop is a tool, not a trick. L or R hops the kart. It settles the kart, starts drifts, and — combined with the Feather (§3) — is the basis of every jump line. The kart's handling is unaffected while airborne, per the physics literature: you land facing and travelling as you took off, so set your line before the hop.
Drifting, as this game actually does it. The control scheme differs from every later game, and both technique sources consulted describe it the same way in substance: a normal drift is initiated by hopping while holding a direction on the Control Pad, and you keep drifting by holding the Control Pad — not by holding L/R as in 64 and after. Holding L or R as well makes it a sharp drift. To end a drift cleanly, release the Control Pad and hop. The practical consequences:
- Drift early. Because cornering without drifting courts a spin-out in this game, the drift is your default cornering state, not an advanced option you add later.
- Vanilla Lake inverts the rule: on ice, start the drift earlier and wider, and never snatch at a sharp drift mid-slide.
- In Battle Mode, drifting is your evasion and your aim: most balloon exchanges happen at drift exits.
The Mini-Turbo — present, invisible, and differently charged. Collecting the correction from the introduction into working instructions: a Mini-Turbo can be achieved in this game — the Drift entry's formulation is that it comes from performing a sharp drift continuously for about three seconds, releasing into a short burst of speed, with no spark or colour change to signal the charge (the absence of any charging animation is stated explicitly in the Mini-Turbo entry). The same entry describes the underlying mechanism in guidebook terms as a boost counter that builds while specific button combinations are held and discharges when they are released. The two descriptions are compatible views (one practical, one mechanical) but they are not word-for-word the same input recipe, so this guide teaches the practical one — hold a sharp drift for roughly three seconds on a long corner, then release cleanly — and declines to print a frame-exact recipe the sources do not state identically. What is not in doubt, and is the point worth paying for: the boost exists here, it is worth about +2–3 km/h on the official guidebook's figures, it lets a releasing kart skip across off-road with reduced slowdown much like a Mushroom, and the long corners of Mario Circuit 4, Koopa Beach and Rainbow Road are where it is earned. If a guide tells you this game has no drift boost, it is describing Mario Kart 64's marketing, not this cartridge.
Coins as a driving plan. Ten coins is the ceiling and every coin is top speed (§2). So: take the coin line on lap 1 even at a small positional cost; after any hit, your first job is re-funding to at least a handful of coins before racing resumes in earnest; and with zero coins, avoid all contact — being jostled with an empty purse is itself a spin. On Koopa Beach and Donut Plains the coin lines run through the shallows and the edges — that is deliberate placement, not decoration.
Who It's For
Time Trial players, first: this is the one Mario Kart whose saved-records mode runs a handling model — invisible drift boosts, coin-funded top speed, four genuinely different driver pairs — that no sequel preserved, so its records are a distinct discipline, not a warm-up for 64. Split-screen rivals, second: Battle Mode here is three balloons, four square arenas, a Feather that jumps the whole fight, and nothing else — many players still rate this original form as the series' best head-to-head game. And series completists tracing how much of the modern genre was already present in 1992: items weighted by position, an unlockable hardest class, a hidden boost technique. It is not for players who want the modern drift system — charging by wiggling or by spark colour belongs to later games, and importing those habits here will spin you out — nor for anyone who needs a gentle Grand Prix: the top-four-or-repeat rule is the strictest advancement gate the series ever used.
How to Play It Today
The reference version for this guide is the original Super Famicom cartridge. The cartridge carries a battery that saves Time Trial records, so on an original cartridge, check whether records still save before paying a premium for a "perfect" copy — a tired battery costs you records, not the game itself, and is a known, bounded issue rather than a defect. For official re-releases: the game was released on the Wii Virtual Console (2009–2010 by region), the Wii U Virtual Console (2013–2014), the New Nintendo 3DS Virtual Console (2016), and the Super NES Classic Edition / Nintendo Classic Mini (2017), and it is included in the Super Nintendo Entertainment System – Nintendo Classics library for Nintendo Switch Online members (added September 2019) — that subscription library is currently the lowest-friction official route, and its version is this same game, DSP chip and all, in emulation. Availability of storefront back-catalogues changes over time; verify the listing in your region before relying on any single route above.
Find the original Japanese cartridge
Disclosure: The Rakuten and Yahoo! Shopping links are standard shopping links. Enkeisha does not earn a commission from purchases made through these links.
Find original hardware editions on eBay
As an eBay Partner Network affiliate, Enkeisha may earn a commission from qualifying purchases made through these links.
Search eBay listings (affiliate link)
Check the language, region, hardware compatibility, condition and authenticity before buying. Search results may include reproductions; links do not endorse individual sellers.